Wishing all my lovely readers a very very Happy New Year!! I know things with everyone would not be really same, some guds, some bads, some ups, some downs, Things in our life will continue as they were, Yes but with change of calender and dates, brings us a hope that the coming year would fetch us something more good.
We had a gr8 dinner last nite Alhamdulillah it wasnt for new year eve celebration though, but we had some guests to attend with and so the meal was very satisfying. As the time went there was a waiting!! Waiting of a year shall end!! My friend Ahmed's wife was aboutt to deliver a baby!! Sometimes online world is strange I feel. When ahmed is in Saudia, Me in Chennai and his family in Kadapa there was still a anxious waiting going on from long time by all of us :) But thats what I think is called heart to heart connection!!
At 12.45am our waiting ended and as the names were being discussed we got the info it is a baby girl!! Oh Alhamdulillah!! New year and new gift to the family. As time passed I was waiting for my bro to get back from work but alas he called up saying he cant get back home heavy traffic for new year celebration, Finally missed my bro and got late to sleep. Well so this is life which goes on, and im sure there r incidents which happening with all of you as well!! Do share in comments if you like on how your new year start was like!!
Getting back to the Recipe Post It is Green Peas Pilaf With Spicy Pouched Eggs and Orange Kheer for today....
This was our meal for sunday lunch and trust me it was so highly satisfying!! Very simple to make...
Simple as in no much of labor can be done with ease just as breeze...... For sure it was loved by all and we ate more than what we usually do.

Green Peas Pilaf
Though I had made this before but with different method!! I was kind of Rice phobic a year back I felt I may not be able to make pilaf and biryani's it may spoil whole lots of ingredients at a stretch. I used to take help from my mom to guide me :) but now she easily asks me to cook even for guests!! Her confidence is slowly increasing to trust me in serving!! And when she is skeptical with my experiments I say oh mom pls trust me, And she replies saying, I trust u but............ and that but has no words beyond it, lol, it makes me giggle to myself :)
.jpg)
Ingredients
Basmati Rice - 3 cups
Oil + Ghee 3tbsp each
Garlic Pods - 7-8 large (adjust if small in size)
Green Chillies - 4-5 slit
Cinnamon Stick -1inch
Salt to taste
6 cups water
Fresh peas - 1.5 cups or more as you wish
Method:
- Heat oil and ghee in a kadai or pot which has a gud packing lid.
- Add in Cinnamon stick, chopped garlic pods and green chillies. Saute for 2 mins just till nice aroma comes, dont let it burn.
- Add in 6 cups water, salt and fresh peas allow it to boil. Once boiled add in soaked and drained rice into the boiling water.
- Allow it to boil again and reach this point (look at the pic below)
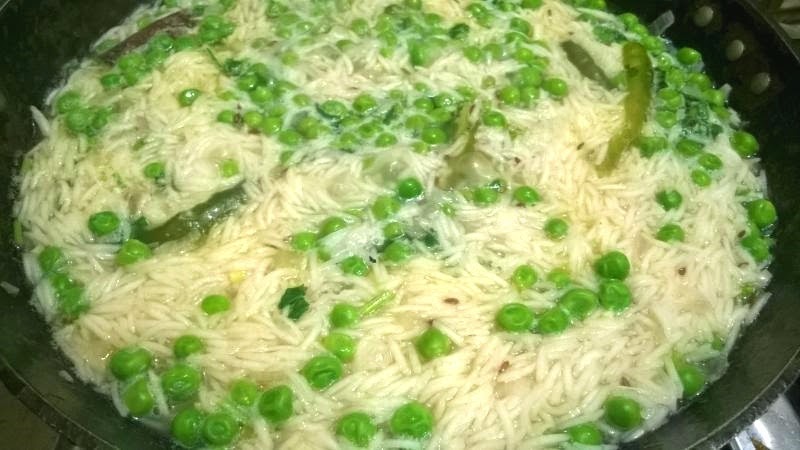 here we can see that rice has absorbed most of the water as it is getting cooked, At this point mix the rice once again and close the lid,
- Let this cook at dum for 12-15 mins in lowest heat.
.jpg) It looks like this after 12-15 mins try to mix it without breaking the rice using a spatula or a fork and close the lid again until ready to serve!!
It looks like this after 12-15 mins try to mix it without breaking the rice using a spatula or a fork and close the lid again until ready to serve!!
Spicy Poached Egg Curry
This is the most simplest curry you can make for winters!! Yes I can bet that you will love it!! Coz this was my try and everyone at home just loved it!!

This Recipe was taken from my lovely friends, Priya n Tessy's Blog Drooools
Ingredients
Eggs -4
Large tomatoes -2
Onion -1
Ginger Garlic Paste - 1tsp
Yogurt half cup
Coriander powder - 1tbsp
Cumin seeds - 1/2tsp
Red chili powder - 1tsp
Garam masala powder - 1/4th tsp
Water - 1 cup
Oil - 2tbsp
salt to taste
Method
Blend the tomatoes, ginger, onion and yogurt in a blender.
Heat oil in a pan. Add the cumin seeds. Once they splutter take the pan off the flame and stir in the coriander powder and chili powder. Mix well and then add the blended tomato- yogurt puree. Stir and return the pan back to flame.
On a medium flame, stirring continuously cook until the oil separates from the sides.
Add the water, salt and allow to simmer for 3-4 minutes.
Carefully break the eggs one by one into the pan in such a way that each egg lies away from the other.
Cover and cook on a very low heat for 15-20 minutes. Do not stir in between.
Sprinkle the garam masala on top and serve garnished with chopped coriander leaves
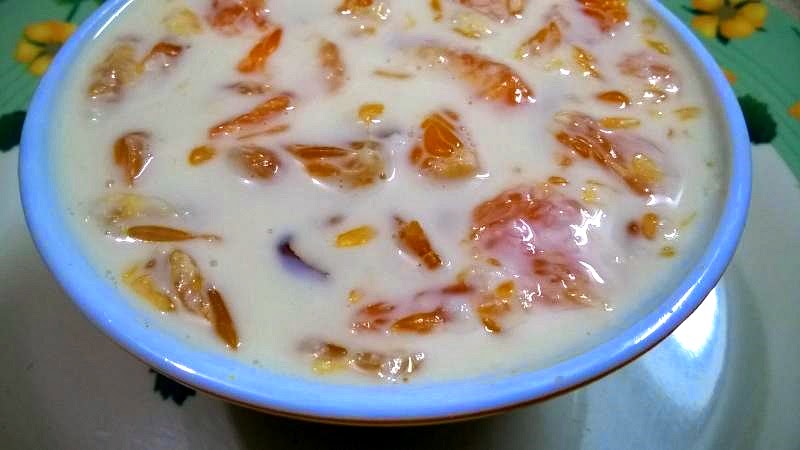
Orange Kheer
Now this kheer is little different!! I so much wanted to make something sweet as in kheer, and saw some orange variations kheer. I browsed more to know how the taste and feedback from people. So finally tried out this unique kheer as our dessert for the noon
Ingredients
Milk -1/2 liter
cardamon 1-2 pods
Saffron strands few (optional)
Sugar as needed
1/4th cup condensed milk
Sweet Oranges -3
Boil milk along with cardamon n saffron strands add sugar once its boiled and reduce the milk to half, add in condensed milk, check for sweetness. add more sugar if u like. once done bring it to room temp.
Add orange segments out of 3 oranges into the normal temp milk, and chill it, garnish with almonds n pistachios and serve it chill
Make sure oranges used are sweet enough. the oranges which i used were sweet but tanginess was more dominating, so be careful with the fruit u select.
My Review and Impression For Orange Kheer: (Should you try it or not??)
Taste of orange kheer: It was more like a drink than a kheer!!
Though it was unique in taste, it was really different and a great try.
I highly felt that something was lacking!!
To me kheer is a thick milk dessert which has richness in taste. The milk base was rich but was lacking volume and so the richness got lost without volume in orange kheer, There was no volume in this dessert to be called as kheer. Appeared to be more as a drink and eat kind of a dish!!
Mom dad and bro all of us had it, We had it as it was a 1st try and was avg to our taste buds. But I think I personally cannot entertain orange kheer until I plan up to give it a basic volume as other kheer recipes with rice, suji or sago 1st. And then add these orange segments and nuts at last!!
Adding rice, suji or sago would make sense if you really want to make this and try out yourself as a kheer!! But As a drink this would be a great thing to try out and please your guests as well
Hope you enjoyed reading my combo recipes :)
Cya until next........... Have a fun filled year ahead :) bubye!!!
We had a gr8 dinner last nite Alhamdulillah it wasnt for new year eve celebration though, but we had some guests to attend with and so the meal was very satisfying. As the time went there was a waiting!! Waiting of a year shall end!! My friend Ahmed's wife was aboutt to deliver a baby!! Sometimes online world is strange I feel. When ahmed is in Saudia, Me in Chennai and his family in Kadapa there was still a anxious waiting going on from long time by all of us :) But thats what I think is called heart to heart connection!!
At 12.45am our waiting ended and as the names were being discussed we got the info it is a baby girl!! Oh Alhamdulillah!! New year and new gift to the family. As time passed I was waiting for my bro to get back from work but alas he called up saying he cant get back home heavy traffic for new year celebration, Finally missed my bro and got late to sleep. Well so this is life which goes on, and im sure there r incidents which happening with all of you as well!! Do share in comments if you like on how your new year start was like!!
Getting back to the Recipe Post It is Green Peas Pilaf With Spicy Pouched Eggs and Orange Kheer for today....
This was our meal for sunday lunch and trust me it was so highly satisfying!! Very simple to make...
Simple as in no much of labor can be done with ease just as breeze...... For sure it was loved by all and we ate more than what we usually do.
Green Peas Pilaf
Though I had made this before but with different method!! I was kind of Rice phobic a year back I felt I may not be able to make pilaf and biryani's it may spoil whole lots of ingredients at a stretch. I used to take help from my mom to guide me :) but now she easily asks me to cook even for guests!! Her confidence is slowly increasing to trust me in serving!! And when she is skeptical with my experiments I say oh mom pls trust me, And she replies saying, I trust u but............ and that but has no words beyond it, lol, it makes me giggle to myself :)
Ingredients
Basmati Rice - 3 cups
Oil + Ghee 3tbsp each
Garlic Pods - 7-8 large (adjust if small in size)
Green Chillies - 4-5 slit
Cinnamon Stick -1inch
Salt to taste
6 cups water
Fresh peas - 1.5 cups or more as you wish
Method:
- Heat oil and ghee in a kadai or pot which has a gud packing lid.
- Add in Cinnamon stick, chopped garlic pods and green chillies. Saute for 2 mins just till nice aroma comes, dont let it burn.
- Add in 6 cups water, salt and fresh peas allow it to boil. Once boiled add in soaked and drained rice into the boiling water.
- Allow it to boil again and reach this point (look at the pic below)
- Let this cook at dum for 12-15 mins in lowest heat.
Spicy Poached Egg Curry
This is the most simplest curry you can make for winters!! Yes I can bet that you will love it!! Coz this was my try and everyone at home just loved it!!
This Recipe was taken from my lovely friends, Priya n Tessy's Blog Drooools
Ingredients
Eggs -4
Large tomatoes -2
Onion -1
Ginger Garlic Paste - 1tsp
Yogurt half cup
Coriander powder - 1tbsp
Cumin seeds - 1/2tsp
Red chili powder - 1tsp
Garam masala powder - 1/4th tsp
Water - 1 cup
Oil - 2tbsp
salt to taste
Method
Blend the tomatoes, ginger, onion and yogurt in a blender.
Heat oil in a pan. Add the cumin seeds. Once they splutter take the pan off the flame and stir in the coriander powder and chili powder. Mix well and then add the blended tomato- yogurt puree. Stir and return the pan back to flame.
On a medium flame, stirring continuously cook until the oil separates from the sides.
Add the water, salt and allow to simmer for 3-4 minutes.
Carefully break the eggs one by one into the pan in such a way that each egg lies away from the other.
Cover and cook on a very low heat for 15-20 minutes. Do not stir in between.
Sprinkle the garam masala on top and serve garnished with chopped coriander leaves
Now this kheer is little different!! I so much wanted to make something sweet as in kheer, and saw some orange variations kheer. I browsed more to know how the taste and feedback from people. So finally tried out this unique kheer as our dessert for the noon
Ingredients
Milk -1/2 liter
cardamon 1-2 pods
Saffron strands few (optional)
Sugar as needed
1/4th cup condensed milk
Sweet Oranges -3
Boil milk along with cardamon n saffron strands add sugar once its boiled and reduce the milk to half, add in condensed milk, check for sweetness. add more sugar if u like. once done bring it to room temp.
Add orange segments out of 3 oranges into the normal temp milk, and chill it, garnish with almonds n pistachios and serve it chill
Make sure oranges used are sweet enough. the oranges which i used were sweet but tanginess was more dominating, so be careful with the fruit u select.
My Review and Impression For Orange Kheer: (Should you try it or not??)
Taste of orange kheer: It was more like a drink than a kheer!!
Though it was unique in taste, it was really different and a great try.
I highly felt that something was lacking!!
To me kheer is a thick milk dessert which has richness in taste. The milk base was rich but was lacking volume and so the richness got lost without volume in orange kheer, There was no volume in this dessert to be called as kheer. Appeared to be more as a drink and eat kind of a dish!!
Mom dad and bro all of us had it, We had it as it was a 1st try and was avg to our taste buds. But I think I personally cannot entertain orange kheer until I plan up to give it a basic volume as other kheer recipes with rice, suji or sago 1st. And then add these orange segments and nuts at last!!
Adding rice, suji or sago would make sense if you really want to make this and try out yourself as a kheer!! But As a drink this would be a great thing to try out and please your guests as well
Hope you enjoyed reading my combo recipes :)
Cya until next........... Have a fun filled year ahead :) bubye!!!
.jpg)
.jpg)
.jpg)
.jpg)
.jpg)
.jpg)
.jpg)
.jpg)
.jpg)
.jpg)
.jpg)

.jpg)
.jpg)
.jpg)