Tuesday 30 September 2014

Tangy Sipcy Fish Curry

Spicy and tangy is point kept in mind when making any fish curry


Being connected to Orrisa and Tamilnadu both I find similarities in the cooking of sea food how much everyone likes the combo of spice and tang together for fish curry. I dont know about other parts of India how they cook fish curry, Do let me know if you got idea, I'll be all grateful to know more :)

This fish curry is very simple because thats how I like to make and classify it too. Adding minimum of oil to my cooking has some where stuck to my head badly and when I see too much oil floating in any food really makes me sick of eating it. Well getting back to the recipe will talk more of this in between the recipe on why really I stress on using oil and fish curries


Ingredients:
Fish any kind - 1kg or more We always get River Water Fish
Fish Masala - 3-4tsp
Onion - 1 large or 2 medium
Tomato - 1 large or 2 medium
Ginger garlic paste - 1tsp
Tamarind pulp / Amchoor - 2tsp or more as needed
Oil- 1/4th cup
Dry spices as you would add in regular gravies according to your taste. I have used 
Chilli powder - 1tsp
Coriander powder - 1tsp heaped
Cumin powder - 1tsp (optional)
Turmeric powder - 1/4th tsp
Salt to taste

Method:
- Grind onion and tomato into fine paste keep it aside
- Clean wash fish pieces, marinate it with 2tsp of fish masala, little turmeric powder and salt for min 10-15 mins. (save the oil to use in gravy if any left)
- Shallow fry, 2 mins each side in medium heat. Make sure not to break the pieces while frying. This process is done to kill the extra raw pungent smell fish may emit into the gravy.
- In a kadai use the left over oil from frying process hardly 1 or 2tbsp oil will be left. If no?? then use fresh oil.
- Heat kadai enough and add in the onion tomato paste, ginger garlic paste, and Fish Masala 1tsp, salt and dry masalas. Saute it till raw smell of ginger garlic paste start fading away it will take 3-4 mins in medium flame. Or cook more if you desire.
- Add in 3-4 cups of water allow it to
boil. 
- As it starts boiling add in fish pieces and lower the flame close lid and allow it to cook in for minimum of 5 mins. 
- Open the lid and add in tamarind pulp / juice just as needed and stir in slowly without disturbing the fish pieces. It will be very soft and might tend to break quickly. 


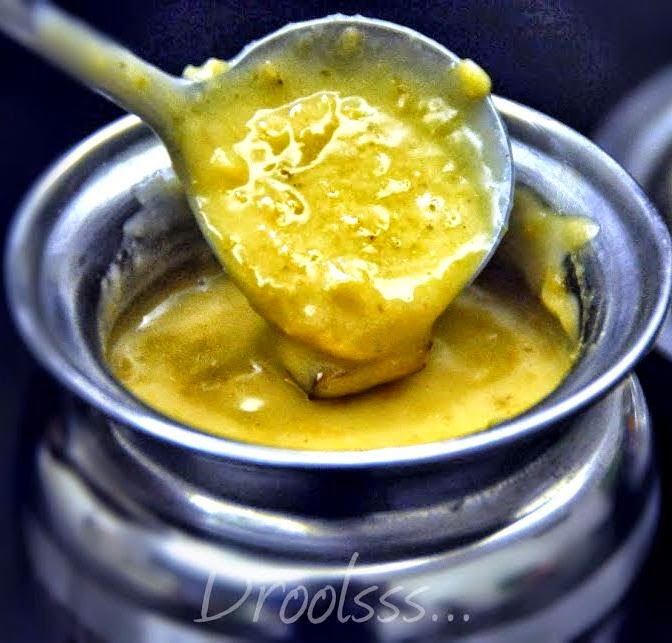
In this pic you can see I have used pieces of fish also including the head part of fish which my family is very fond of. Head part consist of lots of fats and very rich in taste.

- At this point take pleasure to taste the gravy if u need more salt? spice? tanginess? Adjust everything at this point if you want the gravy more runny, you can add in more water too. 
- Boil It again for 2-3 mins in high flame adjusting the consistency and you are done!!
- Serve it with Hot steaming rice & Enjoy


Notes:
- If you want to avoid frying fish at 1st step you can add fish pieces into boiling gravy but again make sure do not stir it as fish might break. Just a shake / jerk to the kadai will be enough.
- I have added ingredients measurements according to my family taste you can plus / minus ingredients as per your choice
- Fish Masala will add a unique flavor and taste to this gravy
- Onion and tomato paste gives thickness to gravy
- Saute the onion paste with spices nicely to kill the smell if not done it might effect the flavor of gravy
- Make sure the taste of this gravy has gud amount of spice and tanginess to eat and drool with
- Boil for more time to reach the right consistency if needed or add water to make it runny if u find it too thick.
- Mostly mom makes use of Dry mango pieces into the gravy is much tangier than tamarind. Here I have used tamarind and got gud taste equally
- Salt water fish can be used for same recipe.


And should I say How nicely I polished off my plate???? 


Sending this to Full Scoops Event Giveaway


Continue Reading

Sunday 28 September 2014

Fish & Shrimps Masala Mom's Style

This masala is too exotic I can define!! It kills the raw smell of sea food and give a nice uniqueness to the taste of end product.

This masala gives such a flavor that even if I'am asked to make fish curry in my way, I like to add this masala a little for the uniqueness. Its not that this masala is addictive after cooking but it really gives a nice taste to the pungent smell of sea food.

Ingredients:
Mustard - 1/4th cup or 3-4tbsp
Garlic Cloves - 6-8 big size (handful if small) peeled!!
Water as needed

Method:
-Grind mustard seeds and garlic together to make a fine paste using some water
- Make sure enough water is added to make it only paste consistency

- Even if it becomes a little watery no problem but make sure its not very runny
- Extra left out masala can be freezed and reused after thawing. 
- Masala in large quantity can be made and freezed in a container and used  little at a time as and when needed.
- Ratio must be taken care of, too much of mustard can make it bitter and also effect the taste of the food

Color of this masala is sometimes light or sometimes dark depending upon the ratio of mustard and garlic taken in use.

This color is just perfect!! 

Will add up recipes related to this masala soon :)

Stay Tuned!!!


Continue Reading

Thursday 25 September 2014

Mutton Lababdaar

This Surely Is Lababdaar..........Here  "Lababdar" means a strong desire of something and complete surrender to it. Lababdar as a term is often attached to many dishes to signify complete surrender of one's taste buds to that dish.


Eid Ul Adha is Nearing People have left for hajj my heart goes so emotional at a point and sincerely pray that may Allah give us this opportunity soon. AMEEN!! And im trying to get in some non veg recipes which can help us all with our new experiments n taste

This recipe is originally shared by Jaspreet Nirula Ji Who Blogs At Saanjha Chulla.  Though I knew Sanjha chulla from long time, but never knew who is the person behind, until finally I caught him in a group!! 

He is a wonderful chef with so much of passion and love towards food. He shares his regular innovative experiments at his space and shares with us too. Today Im sharing the recipe which his wife Chandrika has made and like very gud husband he compliments his wife saying She is better cook than him. Wow :)

Lets see what he has to share with us
My wife Chandrika made this delicious meal exactly the way I like it - succulent slow cooked mutton with delicious masala napped on it and simply had with Lachhedaar Parathas. Absolutely delicious and soul filling. I did my bit here by naming the dish - Mutton Lababdaar  - Sharing the recipe for mutton:

Ingredients 
Mutton 500gm
Curd ½ cup
Ghee 3-4tbsp
Ginger Juliennes – use 1” pc
Kashmiri Red Chili powder 2tsp
Salt to taste

For Spice Paste
Hing a pinch
Nutmeg a pinch
Cumin seeds 2-3tsp
Cinnamon 1 small pc
Cloves 4-5
Black Cardamom 1
Black Pepper corns 5-6
Coriander seeds 1tsp

Onions Sliced 4 medium
Oil to fry

Method:
Deep fry sliced onions to golden brown colour and keep aside.

Now make the spice paste – combine all ingredients in a mortar and pestle and adding very little water, pound it into a paste. Keep aside.

Now take a handi – heat ghee – add mutton, curd, ginger, chilli powder and salt. Bhunno on medium heat till ghee separates. Now add the spice paste and bhunoo for 3-4 minutes. Now add water in little quantity to cook the mutton. When the mutton gets almost cooked, add onions crushing them with your hands. Mix well and cook for another 7-8 minutes. Adjust the seasoning and also the consistency of the gravy – I kept it semi dry to be had with lachhedaar parathas. Garnish as desired.


Thank u so much Jaspreet Ji for allowing me to post your recipe with pic in my space. Since we are nearing to Eid Ul Adha Im sure most of us will enjoy making it.


Continue Reading

Tuesday 23 September 2014

OATS PAYASAM

Payasam sound so soothing!! And the pics is surely going to your breath off......

I welcome Droolsss... today to be my blog host. Ive been following their blog quiet for sometime and totally in love with their pics. I mailed them to ask for a guest post. I kept on talking to priya!! And the reply would come as "we" "we" I tot may be priya consults her family, until I asked for a interview format and hence came to know who is this "We"

Lets Get To know More of Droolsss....

1)Tell us something about yourself
We are two friends (Priya and Tessy), neighbors, moms currently residing in UAE who love to cook, experiment new recipes, share our recipes with others and that’s how we started off with DROOLSSS…. (So the mystery of "we" solved here)

2) How did your kitchen journey start?
Kitchen journey has always started with cooking inspirations which come like for most of us from our moms, grand moms etc. Having watched them cook meals just from scratch without referring to any recipe but just creating tasty and quick meals from just talent and experience. After marriage, for us it had become a commitment to recreate those days for our kids and beloved ones. Residing in a place like UAE where we have access to all cuisines of the world and where all the ingredients are readily available, our kitchen journey flourished into knowing more about the world cuisines. And thereby the commitment turned out into a passion

3) A little about your venture towards blogging?
Friendship and cooking have a peculiar bonding. This qualitative and enchanting bonding is something that should be treasured always. Each dish we have enjoyed over the years may each have a story to tell, a tale of friendship, a tale of sharing, a tale of caring….it is not something that should be forgotten as a history. The happiness that we gained in the form of a smile we received from our near and dear ones when our kitchen experiments tickled their taste buds was really great . We decided to share our treasured happiness with all of you out there, who like us, value friendship and tasty food and the wonderful ambiance it creates. Hence we started off with DROOLSSS…our promise to leave you drooling.

4) What kept you moving with your updates?
Blogging is often loved both as an inspiration as well as a resource. It is something that brings creativity and joy into our life and kitchen. Anything that we whip up in our kitchen has always been first imagined as being uploaded on our blog, and that gives the motivation to make new dishes. It enables us to dare to experiment with different ingredients, different cuisines, tantalizing flavors and mesmerizing aromas and not all, but the best ones end up on the blog.

5) What is the overall differences you find when u 1st started blogging and now?
First and foremost difference is the increase in the number of friends that we have gained through the blogosphere. The encouraging comments and wonderful feedback after trying out the dishes has actually kept us moving. Secondly, blogging has helped us to grow and develop styles in food photography. Food photography has always been a passion just like cooking. Now we feel that we spend more time to get a beautiful click with proper lighting than before.

6) Some words of thought you would like to share with us??Seeing a picture of a delicious dish or enjoying your favorite chef whip up something in a jiff may leave you inspired to try it out. So inspiration can come in any form. Cooking is indeed an art that keeps changing constantly from place to place and hand to hand. There are always endless combinations, flavors, cuisines, cultures, colors and textures to choose from. Cooking is our all-time passion and we are happy that we could share it through the blogosphere. So a thought that we would like to share is that, if you are passionate about something, go for it!

N Here R Some Sweet Words For Me!!
Really so happy to do a guest post for your beautiful blog. Your blog is really amazing! The best part of your blog is your explanation about the dish before the recipe and even the reactions and comments from the members of the family after having the dish. That's really cool! In a very hilarious yet informative way you give the explanation and tips as to how the dish can be improvised etc.

 Here we have decided to do a sweet dish for a sweet person like you, running a blog with the word 'Shweet' in its name again. With the onset of healthy eating habits most of the people have turned oats as their staple food, so here's a sweet payasam with the humble oats. 

Over to the recipe of OATS PAYASAM
Ingredients
1 cup cooking oats.
200gm jaggery.
2 1/2 cups medium thick coconut milk.
3/4- 1 cup thick coconut milk.
1/2 teaspoon cardamom powder.
1/4 teaspoon dry ginger powder.
A pinch of salt.
1 tablespoon cashew nuts(optional).
2 tablespoon of coconut bits.
1 1/2 tablespoon ghee
5-6 tablespoon water

  Method 
  •  Add water to the jaggery and heat it until the jaggery melts.
  • Strain the jaggery and add oats to it.
  • Mix  until the oats is well combined with the jaggery.
  • Cook till the mixture is somewhat dried up.
  • Add medium thick coconut milk and bring it to a boil.
  • When it thickens,add cardamom powder,ginger powder, salt and thick coconut milk.
  • Cook on low flame for 2-3 minutes stirring continuously.
  • Heat ghee in a separate pan and fry cashewnuts and coconut bits until golden brown colour.
  • Add this to the payasam and serve hot.

Thank you so much priya and tessy for your wonderful doorlicious payasam I loved it!! and Iam sure our readers will love it too :)

Visit Droolsss.... @http://drooolsss.blogspot.in/ and check out their wonderful joint venture of Drooling Pics and Recipes :)

Continue Reading

Sunday 21 September 2014

Magic Custard Cake - My 1st Try

Oh I never thought I will make it But I made? Oh yea I did!!

Ive seen the recipe long back and last week +Razina Javed's Post encouraged me to try my own version of this cake!! 


I went to few recipes which I had already saved and had the courage to do!! 


Baking without oven is the task sometime keep ur fingers always cross on what would be the end result.... like!


I found recipes in all website call for same measurement and method. So I stayed with Tast-e because author had showed step by step process it was useful for me to keep a check that way!!


This Article can be considered as my review towards magic custard cake


Recipe was followed to the core!!


But I did face some technical issues as I was not baking on oven but stove top... Sadly I couldn't get the golden crust on top but yes it turned out as it was suppose to be!! 


Recipe Follows 


Ingredients

½ cup unsalted butter (I used 100gms butter + 2tbsp oil)
2 cups milk
4 eggs separated, brought to room temperature
1/8 teaspoon cream of tartar (dint had this)
150g icing sugar (3/4th cup) sweetness was just perfect!!
1 Tablespoon water
1 teaspoon vanilla bean paste (or good quality vanilla extract)
1/8 teaspoon salt
115g flour (1cup)
¼ cup toffee bits and finely chopped chocolate (optional)

Directions

1.      Line an 8x8 inch baking pan with parchment paper.  Preheat oven to 325 degrees F.
2.      Melt butter in the microwave, and leave to cool.
3.      Warm milk in a saucepan to lukewarm. Set aside.
4.      Beat egg whites until a bit frothy.  Add cream of tartar and beat until stiff.  Set aside.
5.      Beat egg yolk and sugar until light.  Add vanilla and salt and beat until mixed.
6.      Add butter and water and beat for 2 minutes.
7.      Add flour and mix until incorporated.
8.      Pour in milk and whisk until smooth and incorporated.
9.      Fold in egg whites 1/3 at a time, using a whisk.  It will have some small lumps of whites.
10.   Pour in prepared baking pan – it will be very runny.  Sprinkle toffee and chocolate on top.
11.   Bake for 45-60 minutes or until the top is golden and the middle is still a bit jiggly.

12.   Cool, then refrigerate until cold. Store in the fridge.

Please visit the above mentioned blog for step by step pics!!


I know this is not the perfect one!! But its my try and im glad I tried it Atleast once!! 


No More Trials with this cake unless I get an oven lolz!!


Impression!!

- Cake smelled eggy!! So Warning to people who have problem with eggy smell. If one is fond of caramel pudding egg version then they will love this cake!!
- This cake got perfect 3 layers base layer was firm, center layer was custardy soft and upper layer was cake which was more soft.
Next time I would prefer more of cake part on top 
- My brother at 1st bite said eggy eggy!! but we both sprinkled lots of cocoa powder and had our treat 

Bitterness of cocoa went too well with this!!


At a point my bro broke this cake into pieces and started mashing up with cocoa powder, I asked him what are u doing????

"Im Killing the eggs inside" he replied!! Hahahaha

Served this to my dad with chocolate sauce!! I had a serving for myself with strawberry crush too!! And It was just yummmmmm


If you have an oven do try this its worth trying!! 


Sending this to FullScoop's Giveaway Event

Continue Reading

Thursday 18 September 2014

Chinese Bread Masala

Hunger is necessity of all new discoveries for me :P


At time I want something spicy, yet something light, healthy, filling crunchy, satisfying and what not. Difficult to fulfill my demand like that, and my hunger increases thinking what to cook for myself.

My food intake is slightly different from my family for various reasons and my eating times varies too!! Hardly once a week or more I join my parents and my bro has got different timings because of his job!! But for parents regular timings maintain 
Breakfast by 9.30am 
Lunch by 2 - 2.30pm and 
Dinner by 9-10pm

Its the start for my bro's carrier and I'm praying and wishing all the best for his efforts in future. So all of us are scattered and eat different things at different timings so for me now my dinner is by 7- 7.30pm maximum Im so hungry after magrib I need something to gulp down quick quick or sometimes I eat what ever mom had cooked in the afternoon.

So one fine evening I had 4 slices of breads with me and thinking what to do, have bread toast with eggs? make french toast? or make bread masala? ok bread masala, but I dont want to do extra work of cutting and chopping grinding tomatoes etc!! Finally tot of clubbing bread masala with chinese style, though I never made it before but everything has a 1st time!!

As I was cooking I was missing my bro how much I love to share with him my new cooking and make him my critics haha. It was when I finished cooking my bro knocked the door I was so glad to see him. Now we can eat together But But But..... Wait I need to click!! Finished clicking and he was fresh mean while, Happily both of us finished the bowl :D 

Ingredients 
Bread - 4 (roughly chopped)
Onion - 1 medium size (roughly chopped)
Cabbage - half of small (roughly chopped)
Capsicum - 1 (roughly chopped)
Soy sauce - 2tsp
Eggs - 2
Tomato ketchep as needed
Salt as needed
Sugar - a pinch
pepper as needed
Chilli powder 1/4th tsp
Vinegar a dash
Oil - 2-3 tbsp

Method:
- Heat oil in a pan and add in eggs scramble it! Dont break it too much.
- Toss in veggies and saute it for a minute.
- Add in the sauces, chili powder, salt, pepper and mix well.
- Add in bread slices and mix well again add in a dash of vinegar and sugar.
- Mix the bread light handed till its evenly coated. Check for salt and you are done
- Serve it hot or enjoy it in normal room temp both will taste the best!!


Notes:
- Adjust the ratio of sauces and spices accordingly as per ur taste this measurement was perfect for me
- Add in chicken cubes too if u want. when u add in chicken the recipe will alter a little. 
1st do the egg process and remove it. Then add chicken with little oil and ginger garlic paste saute it for  a while and add in eggs n veggies to the pan and follow the procedure next
- Breads might become too soft after mixing with veggies due to sauces. Allow it to rest for atleast 5 mins so that it get back to shape once it starts cooling


Impression:
It was just superb according to me!! and my brother if he eats without saying anything it means food is good haha thats the way it is for him!! other wise he is a big complaint box!!


What more can be a moment of joy when Siblings share food from same plate or bowl and when the last bite comes we lovingly say u eat, naa u eat, and finally decide to half half haha :)


Continue Reading

Tuesday 16 September 2014

Sweet Cucumber Lassi

This Drink Is Super Refreshing & I Will Suggest Everyone To Try It For Sure


Ive been trying to figure out some low calorie drinks which is filling and refreshing too. After workouts I want something to chill out with something healthy and nutritious. It is always suggested one should always eat within 45 mins post workouts because our body can absorb high level of nutrients at this point. To keep me full for longer time and curb my unwanted hunger sensation Carrot Milkshake had been in my hit list for long time. But time came for a change and wanted to try my luck over cucumber milkshake.

Also I got suggestions to try for lassi with cucumber!! Great!! Time for something new to try!! I was so much pre-planned yesterday for cucumber milkshake post workout. But then the idea for lassi took over I had some yogurt too  and here is the result!! 

Ingredients:
Cucumber - 2 medium size (peeled)
Curd - 1/4th cup
Milk - 1.5 cup (chilled)
Water - 1 cup (chilled)
A Drop of vanilla essence
Sugar as needed I used 2 dates

Method:
-Blend in everything till nice smooth and forthy
-Serve it chill!!

Note:
- If you dont have chilled milk and water you can add in ice cubes for emergency use
- If you have ample of time for serving you can also keep it in fridge after blending and serve it cold
- This is my measurement of 1st trial. It was just perfect for me. You can adjust the ratio of curd, milk and water according to your availability and choice!!
- If at all you get any particles of cucumber while drinking you will surely not mind!! it really gives a additional taste to the drink


My click was not purposeful it was very casual as I was chatting to Monu over fb, we so much like to exchange pics of what we eat n drink. So my snap was for her without any presentation. And cucumber gives off white greenish shade to the lassi :) which looks very nice

Impression:
Im Flatter Over This Drink!! And hence this quick post!!
It was so refreshing and nice just loved it to the core. 
I cannot explain and express it in words :) Please make it yourself and know the goodness it carries

I will surely try milkshake and let you all know how it turned :)


Haha Im not promoting cucumber though but yess taste is what I need to share with all my friends and readers here :)


Sending this to Full Scoop's Giveaway Event

Continue Reading

Sunday 14 September 2014

Khari Khajoor Ladoo

 This is a very unique and quick ladoo which can be made in short span of time 

Welcoming +Ketaki Ponde Of Paripoorna Paksiddhi Her blog mainly specializes in Maharashtrian cuisine. Some of her recipes are too different. I usual I was in search of some recipe and landed to her blog just like that and got hooked to her recipe of quick kharwas!! I went through most of her recipes which are simple and gud to venture at, And today here she is with presenting her own gud recipe of this wonderful ladoo.

Lets see what Ketaki ji has to share with us. She is humorous when I called her Ketaki Ji this is what she had to reply me " Ketaki please drop the  ji.... it reminds me of my age..... hahaha..." :D


My name is Ketaki Ponde and I blog on www.paripoornapaksiddhi.blogspot.com.
I am a Hotel Management professional and have been working as a Professor in Hotel management institutes for the past 15 years.
 
This blog started in June 2012 loosely on a cookery book Paripoorna Paksiddhi which is authored by my maternal grandmother where in recipes from it would be posted. Along with it a major chunk of my recipes would also get posted.
The book is a tome regarding Maharashtrian food, especially Koknastha Brahmin recipes which are very simplistic and healthy.
 
Today the recipe I would like to share with you is Khari Khajoor Ladoo......hoping all the readers would enjoy reading through and making it as much as I enjoyed.....

KHARI KHAJOOR LADOO
INGREDIENTS
Khari biscuits
10 nos
Khajoor / wet dates
15 nos
Ghee / clarified butter
1 – 1 ½ tbsp
Powdered sugar
½ cup
Badam / Almonds roughly chopped                        
5 – 6 nos
Kaju / Cashewnuts roughly chopped
5 – 6 nos
Elaichi pdr / cardamom pdr
½ tsp

METHOD:
1.       Deseed the dates and mince them. You can also make a coarse paste. The idea is that the stickiness if the dates helps the whole thing to hold together.


2.       Pass the khari biscuits through a blender to form fine powder.


3.       Heat ghee, add the almonds and Cashewnuts. Lightly toast the till they get a light brown colour. Remove them and keep aside.


4.       In the same ghee lightly toast half of the dates, remove.

5.       In a bowl mix all the ingredients together, add in a little more ghee if desired and shape them into laddoos.


6.       In case the laddoos do not hold shape then add in a little more minced dates.


7.       Store in an airtight jar.


Thank you ketaki ji for your guest post and your time devoted!!

If you are interested in Maharastrian cuisines please do visit her space and enjoy browsing in :)


Continue Reading

Friday 12 September 2014

Fruity Nutty Carrot Salad

My Try with carrot salad made me fall in love with it at very 1st 
bursting flavors with nuts was an awesome delight for weight watchers!!

If you have carrots at home please do not miss making this yummy salad and enjoy!!

Today This Yummy Salad Goes As A Guest Post to +Beulah Arun of Fullscoops

She is a lovely baker and her clicks with such neat finishing!! I just love her passion for baking and presenting things!! 

Check here for  Fruity Nutty Carrot Salad Recipe


And dont forget to browse through her blog and try out those wonderful recipe she has shared with us :)


Thank u beulah for this wonderful opportunity to be at your space :)
Continue Reading

Wednesday 10 September 2014

Low Fats Spicy Mutton Curry - Pressure Cook Method

Mutton cannot be low fat food!! But compared to what recipes I keep seeing online I bet this version of mine is much better simpler and low fats too :)


This recipe I tried with a very small portion of mutton and it was just too gud to be clubbed with hot rice for the moment.

Ingredients
Mutton - 500 gms (with or without bones) I used without bones
Onion - 1 large sliced
Tomato - 1 medium roughly chopped
Whole spices - (cloves - 4, cardamon- 4, cinnamon- 1 big stick) 
Ginger Garlic paste - 2tbsp heaped
Dry powdered spices - Chilli powder-1/2tsp heaped, coriander powder - 1.5tsp, cumin - 1.5 tsp and turmeric powder - 1/4th tsp
Oil - 1tbsp
Salt to taste

Method:
- Heat Oil in a pan. Add whole spices, Allow it to splutter
- Add in onion and saute it till little soft.
- Add ginger garlic paste, and tomatoes, and dry spices, saute it and cook it in medium heat, In case u see its burning at the bottom, add a little water and cook till the whole mixture starts emitting nice aroma, this should take 3-5 mins in medium heat.
- Allow it to cool and grind it to smooth paste. If you have hand blender you can start the process in pressure cooker and blend it in pressure cooker itself.
- Add the blended masala into pressure cooker, add in mutton with some more salt and water enough to make it a gravy say 2cups 
- Pressure cook in medium flame for 4-5 whistle. Allow the pressure to drop.
- Open the lid and check the consistency!! If it needs more thickness, cook for few more mins without lid. 
Note* It will thicken once it cools
- If it becomes too thick than needed then u can dilute it with water, depending upon what you want to eat it with!!
- Add A pinch or sugar or 2 just incase its too spicy, sugar will enhance flavor do try!!
- Serve it Hot!!


I had it with rice!! But this curry will go best with anything!! Like Roti/ paratha/ idli and dosa too :)

Notes:
- You can use coconut milk at the end to enhance taste
- Whipped Yogurt can be added for tang at the end
- When you are pressure cooking check in for spices if needed more before you start the cooking process. Add it accordingly if u need more
- Add some coriander leaves for extra flavor.
- Since I dint had garam masala I added whole spices and blended, and the taste was outstanding!! 
- You may use powdered garam masala too if you like!!


Since it is mutton, the color of this gravy will be at darker side :)
You dont have to worry abt the shade when you get such yummy side dish to eat!!

Do try and let us know hw it turned out!!


Continue Reading

Sunday 7 September 2014

How To Re-Use Left Over Indian Sweets

Converting Left Over Sweets Into Kheer Is The Best Answer To It!!


Ahh If you remember my yummy Kaddu Ka Halwa - Indian Pumpkin Dessert aka duplicate Dum Ka Roat!! Yes I couldnt stop doing a left over make over!!

After having Black Chicken With Buttered Rice My brother wanted to have something sweet, midnite was the time and what more I could do to get him satisfy his sweet tooth?? I recalled I had some left over halwa in fridge which I can make use of.

I told him give me 5 mins and went into the kitchen. Took some tablespoons of halwa, diluted it with milk and boiled it to get the kheer consistency added some extra nuts and chilled it to serve :)

Easy na???

- You can Do this make over with any left over halwa you got
- Any kind of peda or Indian sweets also can be used!! How???
     - Take Milk Boil it
     - Roast a little of semolina For example for half liter milk take 2-3 tsp of semolina.
      - Add semolina to boiling milk and allow it to cook in low flame.
      - Crush in the indian sweet and add to the milk. Stir and cook for some time till everything gets well combined. If you want you can grind the sweets in to paste and add to the milk
      - Add sugar and flavoring if needed and serve chilled.
      - Add more milk if needed as per the consistency which you get while boiling.
      - If you are planning to omit semolina and add any veggies to the kheer like carrot / pumpkin then make sure your grate it and fry it well in the ghee and then add to the milk, followed by other steps mentioned above!!


I made this again today and couldnt resist posting!! coz it was all so yumm and delicious, mom and dad had it without any complaints!! My brother's mood was off so he was not in mood for any sweets!!

Next time If you got Extra Left Out Sweets Don't worry about what to do about it!! Just store it in your Fridge And Re-use When ever needed :)

Hope you liked this post!! Anytime you try this out do let us know how it turned out :)


Sending this to Beulah's Full Scoop's Giveaway

Continue Reading

About Us

Designed By Seo Blogger Templates- Published By Gooyaabi Templates