Friday 29 November 2013

Fool Proof Baking Without Oven Or Pressure Cooker

You so much want to bake your own cake? and dont have an oven? Then this post is just for you you and you!!


Since Christmas is around I felt this is the right time to make a post on this topic. And Also my lovely friend Noaf was insisting me to show her this method. When I was late to make a post, she finally said Aara U love everyone and not me, U dont show any love to me hehe Well so Dear Noaf I love as much As I love everyone :P So this post Specially for You!!

Here Im not using pressure cooker, neither the most famous stone oven, or sand oven! Its just so very simple that even If u have an oven you might want to try out in stove top just for sake to knowing the result! Oh ok may be its too much to praise this method but honestly a boon for ones who want to bake. 

Before When I used to see pics of cake and recipe I would just neglect because NO OVEN!! no idea how to make cake without oven, and I just kept avoiding! some of my online frnds kept saying me about baking without oven and still I dint pay heads! until last year when I decided to bake without oven. But before that I made lots of research over this subject and finally decided to jump. This is my 1st attempt and result!!


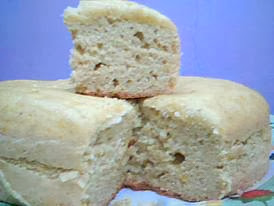
                       Eggless Chocolate Moist Cake!


You My 2nd attempt was Eggless Yogurt Brownie 


 Then It was Mango Banana Cake


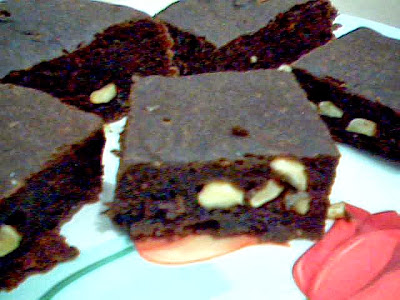
Next was Dense Dark Chocolate Brownie
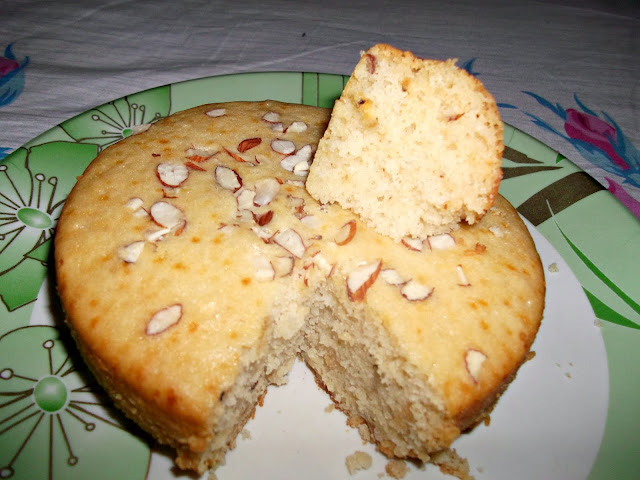
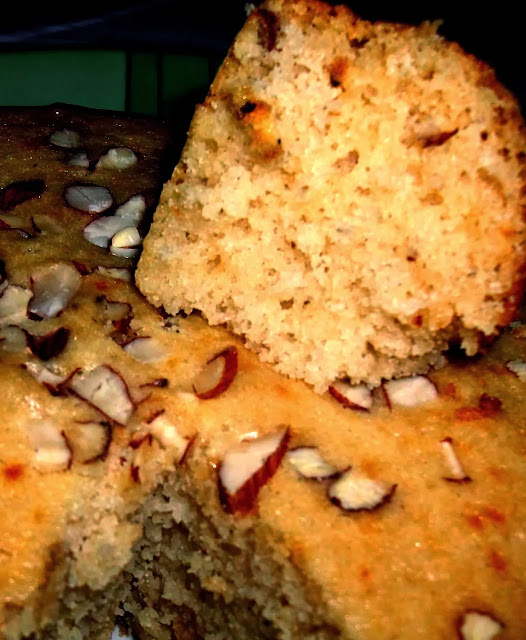
All of them tasted absolute delicious! Let it be brownie or cake It was just awesome 

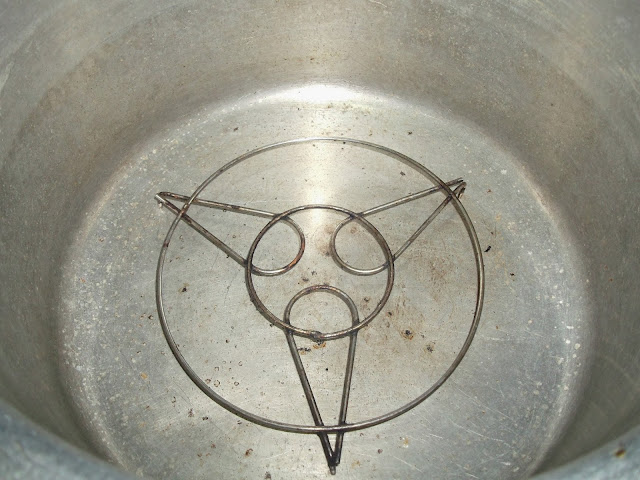
So here Things we need to do the baking is:
- A Round pot big enough to place the cake tin
- A well pack lid for the pot
- A small ring/ separator to hold the cake tin

Lets prepare our own oven 

Starting by pre heating the oven.
- Keep the pot over stove, place the ring in center and close the lid of the pot, In low heat let it pre heat for 10 mins or till your cake mould is ready to go in!! 


- By this time our oven is ready.... Be careful, use a hand glove or a thick variety of towel while handling things.


- Open the lid and place the cake tin inside carefully enough that ur hand skin dont touch anywhere the pot, its quiet hot! Do not tilt also, cake batter may get disturbed! so make sure u get a big enough pot to bake.


Close the lid and increase the flame to high so that the heat which has escaped while the lid is open retain back. Again put down the heat to medium low and bake for the time till required

- It is suggested not to disturb the baking time by opening the lid again and again to check But honestly I myself get excited to check if its baking or not! 

- So the tip is when ever u open the lid, and put back after checking, increase the flame for 1 min, so that it restore the lost heat inside the oven and get back to low medium heat.

- Baking time may vary according to the density of batter and also the kind of pot we are using! If it is heavy pot, it might take time, But I have always used thinner variety of aluminium or indolium. So my baking time would be exact as that of baking time taken in oven with Celsius degree.

- It is always gud to check by inserting a sekwer to check if the cake is done! if its not done! you can always extend your baking time to 5- 10 mins or more 

- Do not leave the cake inside the pot unless the recipe calls for, Some times over exposure to heat may make the cake texture dry. 


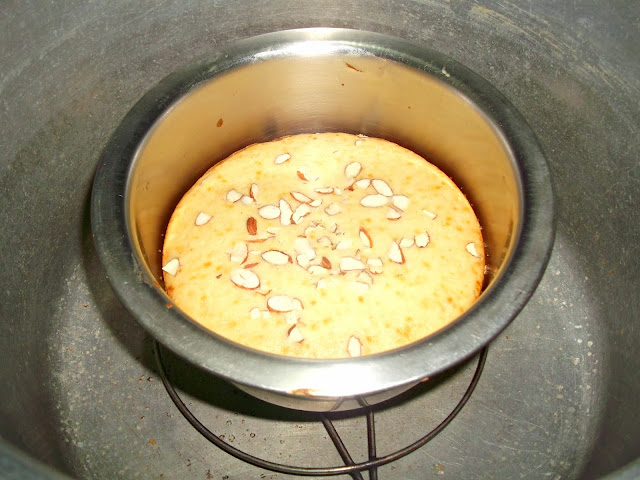
This cake show above was baked a month back at my aunts place in Nagpur. She had a ready made cake mix pack of milkmaid creations and wanted me to bake in cooker! But she had small cooker where the cake tin couldnt be placed. So I came up with my own method of baking and you can see the pic above! 


I have darken the pic shade to show the sponginess of the cake fluffy and porous  result It gave :)


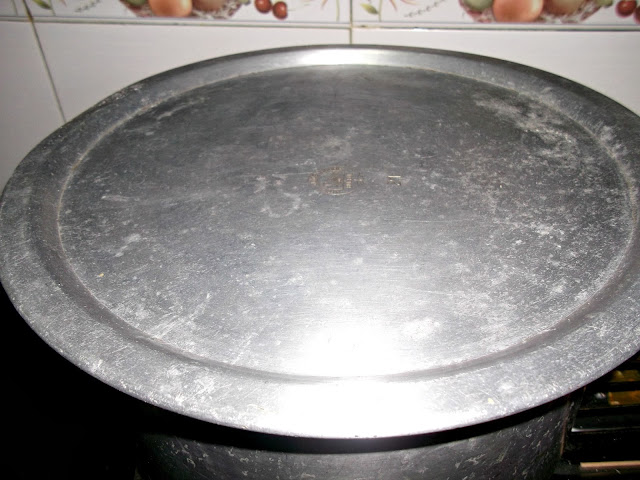
At home I use this pot and this kind of lid which packs well at the Rim of the pot!

Since all of us must be having big pots at home, its easy to bake now isnt it?

Notes:
- Always keep in mind the size of tin and pot to be used! before you start preparation Check out if you can place the cake tin inside the pot easily or not! 
- If u feel anywhere there is gap between lid and rim or its loosely pack! always keep a weight on top of the lid!
- Make sure you follow the instructions for making cake properly :)
- You can use any type of ring as separator as long as It can hold the cake mould/ tin
- I had also made pizza using this method


If there is anymore quires Do feel free to ask me :)

All the best if you try this way!

Do let me know how it turned out!!


Continue Reading

Wednesday 27 November 2013

Chicken Haleem Pakistani Style

Today on Blog Is Chicken Haleem Pakistani Style


Pakistani style? ummm yes today im  Crossing the boundaries of India and Dragging +Monu Teena To My Space For her Lovely Chicken Haleem Recipe Which she learnt from her mother in law! 


Also to share my joy here! My Blog has Crossed 50k views and reached 100 Followers by now this week! Im so Glad Thank you all of you for all the love and support I keep receiving :)


So to Introduce Monu as a blogger She blogs at RecipesPassion ! She has wonderful and simple recipes in her space! And when I talk to her she is all bubbly chubbly in her ways, talk, and nature :) Its all fun to be along with such lively bloggers! When I had asked her for a guest post She was all excited and finally we ended deciding for haleem which she said she makes too well as she had learnt from her MIL. Im Glad she got such a wonderful loving MIL. 


Getting back to the guest post lets see what she has to say!!


Hi Guys....  I am Monu Teena from Pakistan. Recently blogging on RecipesPassion. Well to me cooking is more than a passion for me. I am one of those who are inspired from nature which has a huge reflection on my cuisines. I try to keep the royal traditional essence in my cuisines. And, I also try to blend colors with smell to create a new taste. Because what you eat is what you are.
I have a vast experience in cooking, baking since I was only 10. It’s been almost 16 years passed. But I still call myself a learner. I would love to have your recommendation & suggestions.
Other than my passion, I am Engineer by profession and a student of MBA.

 I met Aara for the first time on blogger. And I was invited for a guest post by her.

Today our main objective is just to introduce Pakistani traditional food. I am done with chicken Haleem. Haleem/Daleem is one of the popular foods in Asia and middle east. It has been for many centuries & a special importance in Islamic History. It is usually prepared in the Islamic month of Muharram in hijri calendar. Haleem is made of meat, lentils, wheat/ Barely and spices. Recipe varies from region to region.
Time to just move on to the recipe.. So let's start with the ingredients


CHICKEN HALEEM:

Ingredients you will need : 

0.5 Kg chicken/Boneless (can use Mutton or beef) 
125 gm Gram lentil 
50 gm Rice 
350gm Whole wheat 
50 gm White lentils
1/2  tbsp Ginger paste 
1/2 tbsp Garlic Paste
3/4 cup Yogurt
2 Onion  chopped 
2 Tomatoes chopped
3 Green chilies
few Coriander leaves
4 tbsp of oil

Spices & Seasonings
1 tbsp Red Chili flakes
1/2  tsp Turmeric  powder
1/2 tbsp Coriander powder 
1/2 tsp Cumin powder 
Salt  to taste
1/4 tsp all spice powder/Garam masala  

To Garnish
1 piece ginger cut into julienne
Brown onion  (cut the 2 medium sized onions in julienne and deep fry ) as required
Lemon  1-2


Steps to follow:
- Soak  the whole wheat, gram lentil, white lentils, rice in water and leave it for 3 to 4 hours. 
- Boil The soaked above mixture in low heat till everything is mixed and mashed up.
- In a deep pan fry the onions in oil till golden brown. Add ginger garlic then tomatoes, spices and the seasonings.
- After that add the chicken pieces. Pour Water cover the lid and let it cook on low heat, till chicken pieces are tender.
- Now Blend the Whole wheat mixture. To this now add the spicy chicken mixture and blend again.
- Delicious chicken haleem is Ready now!
- Serve it hot With Naan/ Bread
- Garnish it with Lemon, Chillies Coriander and Fried Onion.


Thank u Monu for your lovely recipe! and I know making haleem is not a simple task! it really takes a very long time and patience to make it! Thank you For such a lovely guest post and pic! Hope to Get more Traditional recipes from you in near future!!


Happy Blogging!!


Please visit her blog for more simple Pakistani cuisine 


Some of her recipes which caught my attention were 

Cream Fruit Salad
Orange Chocolate Marble Cake &
Dates Honey Balls

Check out her space for more!! 


Continue Reading

Saturday 23 November 2013

No Bake No Cheese White Pasta

No cheese No Bake Yes you read me right!!


If you had tried pasta in white sauce before you might wonder how no bake and no cheese in the recipe??? If you havent tasted before pls follow the recipe and go ahead making it. Its so simple and when It comes to food I am so Honest with my taste and my readers :) Since It is no cheese and still yummy to taste, I can count it in Low Fats Version.

I always avoided trying this dish for 2 reasons, 1st was baking! I dont have an oven... And next is using cheese, Me and my family are not much of cheese likers so we dont get cheese at all, unless me or my bro wants to make pizza we get mozzarella cheese. When ever I saw recipes of white sauce pasta I would talk to myself, One day i'll make it for sure, one day and one day went on many months :P So that one day came on one sunday Last week and im here with my own version of No Cheese No Bake White pasta :P

Yes I did some homework too!! To get the core points bfr jumping in to proceed So It isnt really Difficult.

Level: Easy
Preparation Time: 15-20 mins
Cooking Time: 10 mins

Ingredients 
Pasta - 1 cup (Any Kind)
Full Cream milk - 1 cup + more if needed
Water 1/2 cup
Maida / All purpose flour - 4tsp
Oil - 1tbsp + 1tsp + some more while boiling pasta
Butter - 1tbsp
Pepper powder & salt According to taste

Vegetables taken in use.
Capsicum - 1 diced medium size
Sweetcorn - 3 tbsp / as much as desired
Carrot - 1 diced small in size
Can take more veggies of ur choice I had only these available

Method:

How to boil Pasta:
- In a pan take lots of water, add little oil as well, boil pasta for a minute or 2 and leave it to rest in the same water for 15-20 mins with lid closed. This will make sure pasta absorbs enough water as much as it needs and also dont become soggy. Drain the water and keep this aside. you can mix in some oil at this stage to prevent it from sticking.

Working with veggies - In a wok take 1tsp oil and add veggies, saute it for a minute or 2. Keep it along with pasta.


For Sauce:
Option 1 - In the same pan add 1tbsp oil add maida and stir for a while lumps may for at some cases not to worry.
- Now add milk and water and cook in medium till mixture gets thicken nicely (Sauce consistency. Keep stirring to break the lumps if formed any and also to avoid burning.
Option 2
If you are not sure of adding maida to oil, then mix it with milk and water, heat it over pan stirring it continuously so that thick sauce forms as the flour cooks. This way u can omit that extra tbsp of oil :P and use more butter instead on later part 


- Add pasta and veggies add salt butter and pepper powder mix it well, adjust to the taste. 
- Adjust the consistency of white sauce. If u feel its too thick u may add some more milk/ water and adjust it accordingly.


- You are done!! Pasta in white sauce is ready to be served!!

Serve It Hot and Enjoy the delicious taste yummm!!

Is Reheating Possible?
Yes!!
As it cools down it becomes very thick and stick like a whole mass You can easily reheat it over stove.

- In a pan add milk and water accordingly to the amount of pasta to be reheated. Once milk start boiling put this mass sticky pasta to hot milk and now using spoon try to loosen up the whole thing!! As it loosen up it will get back to right consistency as it boils.
- Adjust the taste by adding salt, pepper and butter accordingly!!

As my bro was not there I had Kept his share in fridge and served him next day!! So Im very sure about this part of reheating! And It taste much better next day :P How much I wished I could grab his share as well :P lolz


Notes:
- If you are using skimmed milk do not use water anywhere in the recipe. Use milk throughout instead of water too.
- You can use dried herbs and chilli flakes as ur taste desire.
- Do not over cook the veggies as we need little crunch from them while eating.
- It gave cheesy taste without cheese itself, but if u wish add 1tbsp cheese at the end and mix. 
- After boiling pasta when its kept to rest, make sure u stir it after every 10 mins so that it dont stick.
- Do not forget to add butter It bring out real gud taste to the whole thing.
- you can use 2tsp maida and 2 tsp cornflour / 4tsp cornflour instead if maida is not available


Impression:
I enjoyed my portion It was such yumm!! How did I miss this lovely thing all these years? :(

My Bro said : Ajkal ghar aane par poshtik Khane ko milta hai
(these days when I get back home im getting something healthy to eat)

Ahh so my experiment was paid with his satisfying words lolz

So may be next time i'll try adding cheese and check out the result!
And also was planning to experiment with the same with chicken!!

Stay Tuned!!

Do leave back ur valuable feed backs and tips if any towards the recipe :)

Bubye till next ......................

Linking to
Cooking With Comfort

Continue Reading

Wednesday 20 November 2013

Masoor Pulao With Masala Papad and Masala Curd

Do you see this lovely layout of table? Yummy na??


This wonderful layout is from our lovely aunty in fb Uma Nardas. I think many of us know her, as she is always there in touch with us, promoting our posts and if u check her profile it will be full of beautiful food pics or art made from food. She celebrated 34th wedding anniversary recently and it was really awesome to see her pic with uncle cutting cake.
Recently she started adding pictures from her kitchen and all her dishes are just wow!! 

If you know me I have few guest posts from non bloggers to share their recipes with us which go unnoticed many a times. So with aunty I couldnt stop myself talking 2 her in fb and ask if she would like to do a guest post.  I really wanted to feature her over my blog :) No reasons though but my humble attempt over guest posts is to get  some simple recipes for myself and my readers which are not so common yet non bloggers are expert :) so is uma aunty with lot of her cooking experience hiding inside her which im making a move to explore it out to all u guys!!

Though she gave me the recipe randomly im rephrasing it hence a difficult task to do. Lets get to the recipe 

1
2

lolz Kidding :D

Ingredients

Basmati Rice - 1 cup
Whole Garam Masala- All mixed 
- Boil rice with Garam Masala till fully cooked!
- Drain and Keep aside

Mean while start process of masoor mixture
Black Masoor dal - 1 cup (soaked in water)
Whole Garam Masalas - (2 elaichi, 2 cloves, 1 stick cinnamon, 1 bay leaves)
Curry leaves - 1 spring
Onion - 1 sliced
Tomato - 1 Chopped
GG Paste - 1 tbsp
All powdered spices- 1 tsp each (chilli, cumin, coriander)
Potato - 1 large Fried in cubes
Fried Onion - Random out of 2 onions
Garam Masala powder 
Mint Leaves - 1/4th cup
Coriander Leaves - 1/4th cup
Curd - 4 tbsp
cashew nut- 1tbsp
Milk - 2tbsp with saffron soaked
Oil - 1 tbsp
Ghee - 1tbsp 

- Heat oil in a pan, Add whole garam masala curry leaves, onion, tomato, gg paste and cook it well in medium flame till raw smell of all the ingredients turn aromatic.
- Once the raw smell emits add in the soaked masoor dal, garam masala powder, all other powder masalas, mint and coriander leaves and cook till the masoor dal is cooked. (I think we can add little water here while cooking so that it dont burn out and daal gets cooked evenly)
- Once this is cooked switch of the flame, add curd and mix well.
- Now layer the rice, masoor dal mixture, fried onion, fried potato, cashew nut and saffron milk. 
- Allow it to dum for minimum 5 mins, and you are done!!
- Add ghee from top, save some fried onion, cashew, fried curry leaves and potatoes to garnish from top.

Now im imagining how aromatic smell the whole house must be bursting with


Never Thought Masala papad would look this much appetizing 

For Masala Papad
- Fry Papads Sprinkle Red chilli powder over it
- Garnish it with Chopped onion, tomato, and coriander leaves 
- Sprinkle little salt from top


Its a spicy pulao recipe and no curd to compliment the recipe? no chance!! Curd is something which always stand with biriyani and pulao

For Masala curd:
- In curd add salt, chilli powder and coriander leaves!! done!!

I assume adding some roasted cumin seeds powder will also enhance the taste of masala curd :)Thank you so much aunty for these wonderful recipes with pics. I thoroughly enjoyed editing and writing this Post! Im sure everyone reading this will like it too :)


Cookind With Seeds: Rice


Continue Reading

Monday 18 November 2013

Sweetcorn Cream Soup Indian Style

My Guest Post For Gheza-e-Shiriin

This is a lovely soothing soup to taste buds for chilly winters. Taste bhi Health Bhi.

Last year we came to know how widely sweets corns are available in market. Once mom gradually brought corn to eat and we have roasted it over stove flame to eat it as it is. Mom when she tasted said it dosent seem gud she was disappointed and when I tasted I was doubting and trying to figure out what kind of breed it is :P seriously I can be so innocent. Gud for me that I had tasted sweetcorn kernel available in soup sachets  ;)) Since we had roasted it took me some time to recognize that its sweetcorn. 

My mom dint like it though but I was happy to know we get sweetcorn like this naturally rather sold in expensive packets what I had seen. Now I asked my mom to get Few whole sweetcorn so that I can freeze it for myself :D I started stored sweetcorn kernels you can check the recipe ( Frozen Sweet Corn Kernels ) And use as and when needed. When it was on the process mom tasted sweetcorn boiled and she loved it. Hence me and mom and sweetcorn lovers :P

This year when My mom brought Im kinda on and off dieting so as it contains high amount of natural sugar I was restricting myself consuming. I tried making sweet corn soup in my own way experimenting someway out. 


Today Im Doing a guest post Sweetcorn Cream Soup Indian Style For Huma Of Gheza-e-shiriin. She is a lovely down to earth person who I adore. And I simply love following her blog whole of simplicity shows in her style of writing. We became friends and keep chit chatting over fb :) yes thats the place I connect to many bloggers, but for some reason Huma stands special for me. 

This soup is simple with few Ingredients with more of my personal touch and Indian Flavor. When I tasted myself I was able to say only one thing. Yummy Its Different :) This soup is completely low in calories and fats! So u can try out anytime you like :P Even if ur dieting on and off like me lolz :D

Please visit Gheza-e-Shireen For viewing
 Sweetcorn Cream Soup Indian Style


Continue Reading

Sunday 17 November 2013

Chocolate Lava Cake

Who Dosent Like Melting Chocolate Cake? Even If your counting your calories! I insist pls check out the pic and recipe its so yummy.....


Im Inviting our lovely co blogger Shazzy Karim Of SeasonedwithShazzy. I think many of us know her and many still dont! For a little introduction let me tell u in short, She is a wonderful baker, A business women who bakes delicious sweet treats for her customers, A loving mother to her little son abraham and Wonderful wifey to her hubby ofcourse!!! She is kinda multi tasking women who takes care of various things at a time, She has the instinct to try out various new recipes from cookbooks as well. 

When ever I had a chance to talk with her via mail or fb she is always there sweetly replying back, When I asked her for a guest post she was so happy about it :) but a little confused as what could she do for the guest post 1st she said she would do cupcakes as she is cupcakes queen (laughing) I asked if she makes chocolate lava cake? she happily nodded to my suggestion for chocolate lava cake as she is expert baker! She was already for her its just a tiny toony work for sure :D Isnt it sis? Please Ready below for her detailed recipe!!


Thanks  Aara for the guest invitation..She invited me in couple weeks ago.  Sorry for the delay sister, I’ve been very busy catching up with business and family. Anyway, Aara..what can I says about Aara? Well, I know her definitely from this world of blogging J and been following her on fb too..Stalking her hehe.. ..she’s  lovely and definitely patient waiting for my special dessert..As she told me everyone love this dessert..She personally requested me this dessert..haha! Who doesn’t love Lava Cake or Molten Cake right? Ladies, let me tell you if you think making Lava Cake is tough..well you’re definitely wrong!! Why because this is the easiest and simple to do! You can close your eyes and make this hehe…

Okay, I won’t and will never stop talking..So let me share you this heavenly beautiful recipe.

·         4 pieces (squares) Semi-sweet Baking Chocolate
·         ½ cups Butter
·         1 cup Powdered Sugar
·         2 whole Eggs
·         2 whole Egg Yolks
·         6 Tablespoons Flour
·         2 cups Real Whipping Cream (seriously it’s So Much better!)
·         2 Tablespoons Sugar

Preparation Instructions


- Preheat oven to 425 degrees.
- Spray 4 custard cups with Pam and place on cookie sheet.
- Microwave chocolate and butter in large bowl on high for about 1 - minute, until butter is melted. Whisk until chocolate is also melted.
- Stir in sugar until well blended. Whisk in eggs and egg yolks. Stir in flour.
- Divide between cups.
- Bake 10 minutes until sides are firm and center is soft. Let stand 1 minute.
- Combine sugar and heavy cream and whip until stiff.
- Invert cakes on dishes and top with whipped cream.


P.S: remember if you cook longer than 10 minutes, it no longer have the chocolate sauce in the middle J

See? It’s easy right? Hope you’ll have a great time making this! Its heavenly delicious.


Thank you Shazzy For this lovely Guest Post! Hope To Get more delicious sweet treats form you soon :)

Please visit her blog http://cottonrush.blogspot.in/ and check out other recipes! Im sure u'll love em' 


Continue Reading

About Us

Designed By Seo Blogger Templates- Published By Gooyaabi Templates